![]()
Instruction Manual
If this is your first time using AVNavigator for iPad, start the app by performing the following steps:
![]() Connect an AV receiver to your home network using an Ethernet cable.
Connect an AV receiver to your home network using an Ethernet cable.
![]() Connect your iPad to the same network via Wi-Fi.
Connect your iPad to the same network via Wi-Fi.
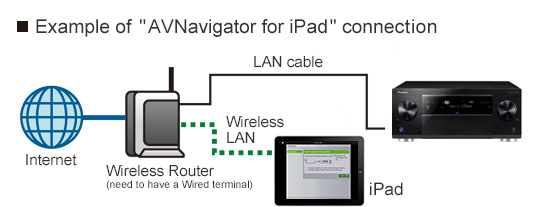
![]() Launch AVNavigator for iPad.
Launch AVNavigator for iPad.
![]() The regional settings screen appears. Follow the instructions to select your location, product and preferred language.
The regional settings screen appears. Follow the instructions to select your location, product and preferred language.
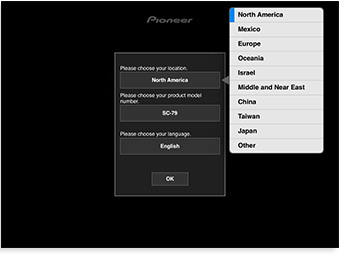
[Regional settings screen]
![[Menu screen (2014 model)]](img/img_en_03.jpg)
[Menu screen (2014 model)]
![[Menu screen (2013 model)]](img/img_en_04.jpg)
[Menu screen (2013 model)] *1
Added "Intaractive Manual" and "Operation Guide" features from 2013 model.
![[Menu screen (2011, 2012 model)]](img/img_en_05.jpg)
[Menu screen (2011, 2012 model)] *1
Tap the "Wiring Navi", "Interactive Manual", "Interactive Operation Guide", "Instruction Manual", "Operation Guide",
"MCACC" and "Settings" icons to switch to the respective screens, as shown below.
"Wiring Navi" screen <This can be used to make the AV receiver connections and initial settings.>
Answer the questions in Q&A fashion to guide you through the connections and initial settings. Follow the instructions on the screen to operate and connect.
* When launching Wiring Navi the first time, be sure to do so with the iPad connected by WiFi.
* Do not turn on the AV receiver's power until instructed to do so by the Wiring Navi.
* When Wiring Navi is launched the first time, certain required information must be downloaded. After Wiring Navi is launched,
"Download Wiring Navi data" is displayed. To download the data, tap the "Download" button.
The download time depends on your network environment. Some time may be required.
The amount of data that is downloaded is large. Watch your connection fees.
* This is a simple setup for beginners. Make detailed settings at the Home Menu on the main unit.
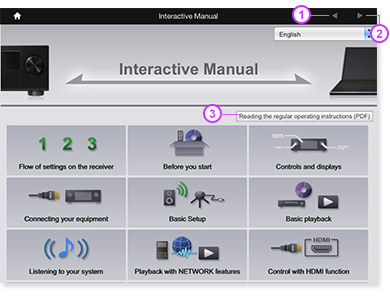
"Interactive Manual" screen <An interactive manual with that communicates directly with your AV receiver> *2
The operating instructions for your AV receiver are displayed.
When clicking a key word (in green characters) in the operating instructions, the AV receiver reacts automatically, accessing that feature.
When operating the AV receiver with the remote control or buttons on the receiver's front panel,
the iPad automatically jumps to the applicable section in the operating instructions with additional information.
* Interactive Manual may not be available for all features/operations.
* When using Interactive Manual for the first time, you will be prompted to download the required data.
A "Download data" notification will appear. Tap the "Download" button to download the data.
Download times may vary depending on your Wi-Fi signal strength
Some data charges may apply depending on your network settings.
* If your AV receiver is not connected to your home network, a "Not connected to target device" notification will appear.
When you use interactive manual with syncronizing, tap the "Connect" button.
When you just see the operating instructions without syncronizing to AVR, tap the "Only used with iPad" button.
1. Previous page
Displays previous page
2. Next page
Displays next page
3. Displayed PDF of operating instructions.
You can view a PDF of your receiver's operating instructions.
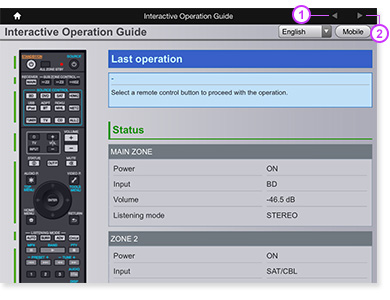
"Interactive Operation Guide" screen <You can operate the AV receiver while looking at the remote control
images and also you can read an explanation of available functions.> *2
The receiver is operated using the remote control on the screen and you can view explanations of functions and videos.
Also, using remote control operation on the receiver, the explanation of the operated function is automatically displayed.
1. Previous page
Displays previous page
2. Next page
Displays next page
"Instruction Manual" screen <This can be used to view the instruction manual.>
* When launching the instruction manual the first time, the instruction manual must be downloaded. After Instruction Manual is launched, "Download Instruction Manual " is displayed. To download the data, tap the "Download" button. The download time depends on your network environment. Some time may be required. The amount of data that is downloaded is large. Watch your connection fees.
1. Reduce
Displays the current page in reduced size.
2. Enlarge
Displays the current page in enlarged size.
3. Jump to top page
Jumps to the top page.
4. Previous page
Displays the previous page.
5. Current page
Displays the number of the currently displayed page.
When tapped, you can specify the page you want to display.
6. Next page
Jumps to the next page.
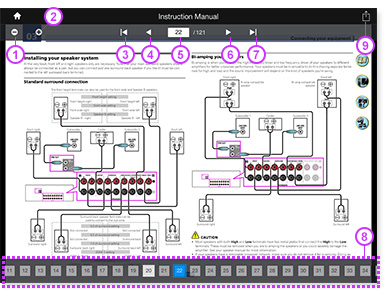
7. Jump to last page
Jumps to the last page.
8. Thumbnails
Scrolls left/right. When tapped, jumps to the tapped page.
9. File export
The downloaded manual can be opened by other applications.
To use this function an application that can display PDF files must be installed on your iPad.
・ Switching pages
Flick leftwards to switch to the next page, rightwards to switch to the previous page.
・ Enlarging and reducing
In addition to the controls in 1 and 2 above, the display can also be enlarged and reduced by pinching in and pinching out.
・ Page link
Tap the blue characters in the Operating Instructions to jump to the detail page for that feature.
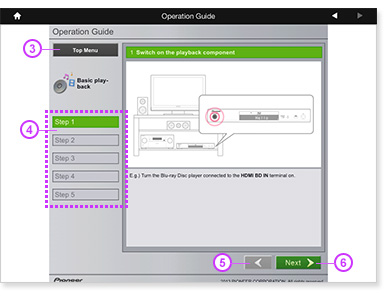
"Operation Guide" screen <Watch videos about the features of your AV receiver.> *2
* This feature works for 2013 models only.
* When using Operation Guide for the first time, you will be prompted to download the required data.
A "Download data" notification will appear. Tap the "Download" button to download the data.
Download times may vary depending on your Wi-Fi signal strength.
Some data charges may apply depending on your network settings.
1. Previous page
Displays previous page
2. Next page
Displays next page
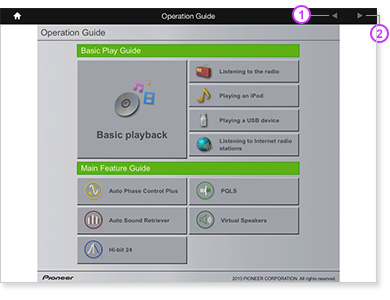
3. Top Menu
Move to the Top page of Operation Guide.
4. Operation Step
You can select and display the operation steps.
5. Previous Step
Displays previous step
6. Next Step
Displays next step
*the operation step is proceeded automatically, after 30 seconds.
"MCACC" screen <This can be used to view the Advanced MCACC measurement results in 3D.> *2
1. Switching the displayed items
The graph or MCACC parameters for the selected items are displayed.
Reverb: Graph of the listening environment's reverberation characteristics
Group Delay: Graph of the speakers' group delay characteristics
Parameter: All MCACC parameters (measurement results)
* "Group Delay" is only displayed if the connected
AV receiver supports the Full Band Phase Control function.
* If there is no reverberation characteristics data, the Reverb graph is not displayed.
In this case, you need to measure reverberation characteristics from the home menu of the AV receiver.
For details, see the operating instructions of the AV receiver.
2. ZOOM slider
Enlarges or reduces the graph.
3. Switching the operation
Select the operation when the graph is dragged.
4. Legend
Displays which channels/frequencies the graph colors correspond to. When the graph of the speakers' group delay characteristics is displayed, the following channels are displayed at the most:
F: Front, FH: Front Height or FW: Front Wide,
C: Center, S: Surround, SB: Surround Back
5. Switching the display between all and individual channels
Select whether to display all the channels or individual channels (left, center, etc.) and specify the graph to be displayed.
6. Switching between channels and frequencies
Channel: Display mode for specifying the channel
(The frequency is displayed on the graph's depth axis.)
Frequency: Display mode for specifying the frequency
(The channel is displayed on the graph's depth axis.)
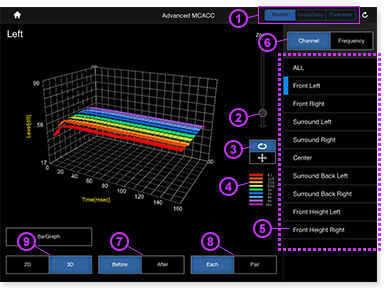
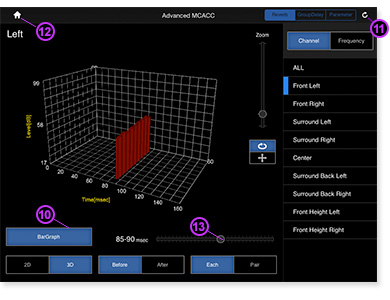
7. Switching between the graphs before and after calibration
The graph before calibration is displayed when "Before" is selected, the graph after calibration when "After" is selected.
8. Switching the reverberation characteristics graph display type
Each:All channels are displayed individually. This is the type of graph displayed when EQ calibration is performed using the
[ALL CH ADJUST] procedure.
Pair:The reverberation characteristics are displayed as a compound of the left/right pairs of the front, surround and surround back channels. This is the type of graph displayed when EQ calibration is performed using the [SYMMETRY] or [FRONT ALIGN] procedure.
9. Switching between the 2D and 3D display
Select whether to display the graph in two or three dimensions.
10. Switching the display between a band graph and a bar graph
Change how the graph is displayed. Switch the display between a band graph and a bar graph.
11. Reacquire data
Reacquire the MCACC measurement data from the AV receiver.
12. Back
Return to the Menu screen.
13. Moving the time axis or frequency axis
Reverb: Moves the time axis.
Group Delay: Moves the frequency axis.
This slider is only displayed for the bar graph display.
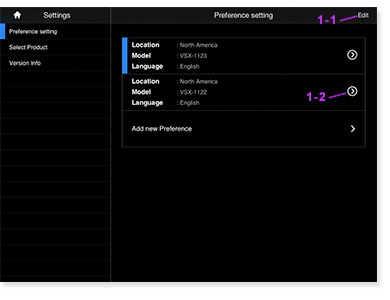
"Settings" screen
1. "Preference setting" screen
This displays a list showing the region in which you are registered as living, your model number and language. A new environment can be registered here.
1-1."Edit" button
This can be used to re-sort the environment list you have registered or to delete it.
1-2."Change Registered Information" button
Use this to edit registered information.
2. "Select Product "
When you want to load MCACC measurement data from the AV receiver, the AV receiver and AVNavigator for iPad can be connected beforehand.
2-1."UPDATE" button
When the "UPDATE" button is tapped, AV receivers in your network environment are searched for. When an AV receiver matching the current environment settings is found, the region and model name are displayed.
* Note that if the AV receiver that was found differs from a model for the region in which you are registered,
it cannot be selected.
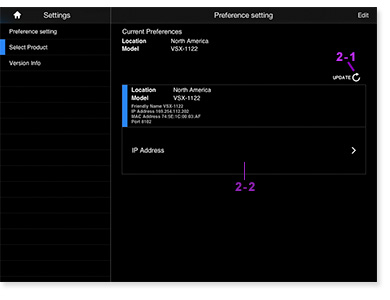
2-2."IP Address"
In addition to searching with the "UPDATE" button, it is also possible to connect by inputting the IP address of the AV receiver.
When "IP Address" is tapped, the IP address input screen appears. Input the IP address of the AV receiver you want to connect, then tap the "Search" button.
* For instructions on checking the IP address of controllable models, see your AV receiver's operating instructions.
3. "Version Info"
Displays the AVNavigator for iPad's version information.
2013 models :
SC-79, SC-77, SC-75, SC-1523, SC-1528, SC-72, SC-1323, SC-1328, SC-71, SC-1223, SC-1228, VSX-70, VSX-1123, SC-LX87, SC-LX77, SC-LX57, SC-2023, VSX-1123, VSX-923
2012 models :
SC-68, SC-67, SC-65, SC-1522-K, SC-1527-K, SC-63, SC-61, SC-1222-K, SC-1227-K, VSX-60, VSX-1122-K, VSX-1127-K, VSX-1027-K, SC-LX86, SC-LX76, SC-LX56, SC-2022-K, VSX-1122-K, VSX-922-K
2011 models :
SC-57, SC-55, VSX-53, VSX-52, VSX-51, VSX-50, VSX-1121-K, VSX-1021-K, SC-1526-K, VSX-1326-K, VSX-1126-K, VSX-1026-K, VSX-926-K, SC-LX85, SC-LX75, VSX-LX55, VSX-2021-K,VSX-1021-K, VSX-921-K
(*2) Depending on the connected AV receiver, some functions may not be used.
Frequently Asked Questions (FAQ)
Q1.With what models of AV receivers can this application be used?
A1. Check the applicable models listed on the application's introductory page.Q2.I'm having problems downloading AVNavigator for iPad.
A2.Do you have a login ID for the App Store (iTunes Store)?You may have problems downloading the application in places where the WiFi or mobile phone connection environment is poor.
In this case, wait awhile then try downloading again.
Q3.What is the application's required operating environment?
A3.The application can be used on iPad devices running on iOS 5.1 or later.Q4.Is this app available for the iPad mini?
A4.Yes, it is compatible with the iPad mini.Q5.Does this app support Retina display?
A5.Yes, AVNavigator will take full advantage of the Retina display on your iPad.Q6.What sort of preparations are required before using the application?
A6.Before launching the application, connect the iPad via WiFi to the wireless LAN router.Q7.When I launch AVNavigator for iPad, I get the network error message "Internet connection failed. Please check your network settings or Preference. Download Wiring Navi data for your AV receiver.
A7.Is your iPad connected to your network environment by WiFi? The WiFi markQ8.When I launch AVNavigator for iPad, I get the download error message "AVNavigator information was not found.
A8.You may have problems downloading the required information in places where the WiFi connection environment is poor. In this case, wait awhile, then tap the retry button and try downloading again. In this case, wait awhile, then tap the retry button and try downloading again.Q9.I don't know the model number.
A9.The model number is indicated on the package, the AV receiver's front panel, etc.Q10.My 2012, 2013 or 2014 AV receiver is not included in the list of available models.
A10.You may be using an old version of AVNavigator. Confirm you're using 4.0.0.Q11.Why don't I see "Interactive Manual" and "Operation Guide" features?
A11.Available functions differ depending on the currently selected model.Q12.What is the difference between AVNavigator for iPad and the version that comes on the CD-ROM in the box?
A12.For 2013 receiver models, the operation is essentially the same, except the CD-ROM version does not include software updating assistance. For 2011 and 2012 receiver models, "Interactive Manual", "Operating Guide" and "MCACC"features are not supported.Q13.The network error message "Internet connection failed. Please check your network settings or Preference." is displayed.
A13.Is your iPad connected to your network environment by WiFi? The WiFi markQ14.The download error message "Download Failed. Please check your network settings or Preference." is displayed.
A14.You may have problems downloading the required information in places where the WiFi connection environment is poor.In this case, wait awhile, then tap the Wiring Navi icon on the Menu screen again.
Q15."Not connected to target device" is displayed.
A15.Displayed when not connected to the AV receiver.If a 2014 model AV receiver is selected, to use Wiring Navi you must connect to an AV receiver.
Q16."Internet connection failed. Please check your network settings or Preference." is displayed.
A16.Confirm your iPad is connected to your Wi-Fi network. The WiFi markQ17."Download Failed. Please check your network settings or Preference." is displayed.
A17.You may have a weak Wi-Fi signal. Try moving to a different location.Q18."Not connected to target device" is displayed.
A18.Your AV Receiver may not be connected to your home network. When you use interactive manual with syncronizing, tap "Connect" button. When you just see the operating instructions without syncronizing to AVR, tap "Only used with iPad" button.Q19."Not connected to target device" is displayed.
A19.Displayed when not connected to the AV receiver.If a 2014 model AV receiver is selected, to use Interactive Operation Guide you must connect to an AV receiver.
Q20.The network error message "Internet connection failed. Please check your network settings or Preference." is displayed.
A20.Is your iPad connected to your network environment by WiFi? The WiFi markQ21.The download error message "Download Failed. Please check your network settings or Preference." is displayed.
A21.You may have problems downloading data in places where the WiFi connection environment is poor.In this case, wait awhile, then tap the Operating Instructions icon on the "Select Menu" screen again.
Q22.The download error message "Download Failed. Please check your network settings or Preference." is displayed.
A22.You may have problems downloading the required information in places where the Wi-Fi connection environment is poor.Try moving to a different location.
Q23.The message "No MCACC data. Do you wish to download MCACC data? " appears.
A23.This message is displayed when there is no MCACC measurement or settings data in the application. Perform the Full Auto MCACC procedure on the AV multichannel receiver. If you have already performed the Full Auto MCACC procedure, tap the "Getting MCACC data " button.
When you tap the "Display MCACC demo data " button, a demonstration graph display appears.
Q24.The network error message "Please check your WiFi network.." appears.
A24.Is your iPad connected to your network environment by WiFi? The WiFi markQ25.The "Select Product" screen appears.
A25.This message is displayed when the application and AV receiver are not connected, even if the iPad is connected to your network environment by WiFi. Select the AV receiver you want to connect to from the "Select Product " screen.If the desired AV receiver is not displayed on the "Select Product " screen, it is also possible to connect using the IP address. Select "IP Address" on the "Select Product " screen, input the AV receiver's IP address on the screen for setting the IP address manually, then tap the "Search" button.
Q26.The "Select Product " screen appears but there are no devices for selection.
A26.This message is displayed when the application and AV receiver are not connected, even if the iPad is connected to your network environment by WiFi. Is the AV receiver connected to the same network environment as the iPad?If the AV receiver is not displayed on the "Select Product " screen even though it is connected to the same network environment as the iPad, it can still be connected by setting the IP address manually. Tap "IP Address" on the "Select Product" screen, input the AV receiver's IP address on the screen for setting the IP address manually, then tap the "Search" button.
Q27.The download error message "Failed to download data. " appears.
A27.You may have problems downloading MCACC data in places where the WiFi connection environment is poor.In this case, wait awhile, then tap the retry button and try downloading again.
When you tap the "Display MCACC demo data " button, a demonstration graph display appears.
Q28.The IP address I set before is still displayed on the IP address input screen. What should I do?
A28.To connect to a device with a different IP address by inputting the IP address manually, simply overwrite the previous IP address.Q29.The graph does not display when I start MCACC.
A29.You need to do a Full-Auto MCACC (automatic sound field tuning) once on the AV receiver itself.However, with the AV receiver released in 2014, even though full auto MCACC is performed, reverberation characteristics is not measured and the reverberation characteristics (Reverb) graph is not displayed.
For details, see the operating instructions of the AV receiver.
Q30."Group Delay" is not displayed in the MCACC items.
A30."Group Delay" is only displayed for products supporting the group delay function.Q31.How many AV receivers can be recognized?
A31.As long as they are on the same network, all AV receivers are recognized, but it is only possible to connect to one AV receiver at a time.If multiple units have been recognized, the desired AV receiver must be selected on the "Select Product " screen.
For Introduction Features and Download (AV Navigator Application Support & Guide Top page), click here.
iPad and iPad mini are trademarks of Apple Inc., registered in the U.S. and other countries.
iOS is a trademark on which Cisco holds the trademark right in the US and certain other countries.